Skip to content

ROCKPro64 - RP64.GPIO

Angeheftet Verschoben Hardware
  • Heute mal eine Bastelstunde und direkt vorne weg eine dicke fette Warnung!

    Hiermit kann man seinen ROCKPro64 in Elektroschrott verwandeln! Ich hafte nicht für Schäden! Hirn einschalten vorher! 😉

    0_1537440456037_IMG_20180920_124609_ergebnis.jpg

    Für den Rock64 gibt es ein Projekt das die RPi.GPIO cloned. https://github.com/Leapo/Rock64-R64.GPIO

    A Python GPIO library for the Rock64 single-board computer (RPi.GPIO clone).

    GPIO - was ist das? Wiki

    Gut, damit läuft das aber nicht auf einem ROCKPro64, weil die Nummerierungen der Pins nicht passen. Aber dafür gibt es da draußen Leute, die sich solche Themen erarbeiten.

    Quelle: https://forum.pine64.org/showthread.php?tid=6419&pid=40185#pid40185

    Erstmal das Ergebnis 🙂

    Output Test R64.GPIO Module...
    This channel (ROCK 52) is already in use, continuing anyway.  Use GPIO.setwarnings(False) to disable warnings.
    
    Testing GPIO Input/Output:
    Output State ELSE: 1
    Output State IF : 0
    Output State ELSE: 1
    Output State IF : 0
    Output State ELSE: 1
    Output State IF : 0
    Output State ELSE: 1
    Output State IF : 0
    Output State ELSE: 1
    Output State IF : 0
    Output State ELSE: 1
    

    Video

    So, nun das Ganze mal von vorne.

    Software

    Wir brauchen Python

    sudo apt-get install python
    

    Danach laden wir das Projekt

    git clone https://github.com/Leapo/Rock64-R64.GPIO
    

    Wie oben schon geschrieben, passen die Pin Nummern nicht.

    cd Rock64-R64.GPIO/R64
    nano _GPIO.py
    

    In dieser Datei ergänzen wir wie folgt.

    # Define GPIO arrays
    #ROCK_valid_channels = [27, 32, 33, 34, 35, 36, 37, 38, 64, 65, 67, 68, 69, 76, 79, 80, 81, 82, 83, 84, 85, 86, 87, 88, 89, 96, 97, 98, 100, 101, 102, 103, 104]
    #BOARD_to_ROCK = [0, 0, 0, 89, 0, 88, 0, 0, 64, 0, 65, 0, 67, 0, 0, 100, 101, 0, 102, 97, 0, 98, 103, 96, 104, 0, 76, 68, 69, 0, 0, 0, 38, 32, 0, 33, 37, 34, 36, 0, 35, 0, 0, 81, 82, 87, 83, 0, 0, 80, 79, 85, 84, 27, 86, 0, 0, 0, 0, 0, 0, 89, 88]
    #BCM_to_ROCK = [68, 69, 89, 88, 81, 87, 83, 76, 104, 98, 97, 96, 38, 32, 64, 65, 37, 80, 67, 33, 36, 35, 100, 101, 102, 103, 34, 82]
    ROCK_valid_channels = [52,53,152,54,50,33,48,39,41,43,155,156,125,122,121,148,147,120,36,149,153,42,45,44,124,126,123,127]
    BOARD_to_ROCK = [0,0,0,52,0,53,0,152,148,0,147,54,120,50,0,33,36,0,149,48,0,39,153,41,42,0,45,43,44,155,0,156,124,125,0,122,126,121,123,0,127]
    BCM_to_ROCK = [43,44,52,53,152,155,156,45,42,39,48,41,124,125,148,147,124,54,120,122,123,127,33,36,149,153,121,50] 
    

    Das Ganze dann abspeichern.

    Im Pfad rock64@rockpro64v_2_1:~/Rock64-R64.GPIO$ eine Datei anlegen test.py

    #!/usr/bin/env python
    
    # Frank Mankel, 2018, LGPLv3 License
    # Rock 64 GPIO Library for Python
    # Thanks Allison! Thanks smartdave!
    
    import R64.GPIO as GPIO
    from time import sleep
    
    print("Output Test R64.GPIO Module...")
    
    # Set Variables
    var_gpio_out = 52
    #var_gpio_in = 18
    
    
    # GPIO Setup
    GPIO.setwarnings(True)
    GPIO.setmode(GPIO.ROCK)
    GPIO.setup(var_gpio_out, GPIO.OUT, initial=GPIO.HIGH)       # Set up GPIO as an output, with an initial state of HIGH
    #GPIO.setup(var_gpio_in, GPIO.IN, pull_up_down=GPIO.PUD_UP)  # Set up GPIO as an input, pullup enabled
    
    # Test Output
    print("")
    print("Testing GPIO Input/Output:")
    
    while True:
            var_gpio_state = GPIO.input(var_gpio_out)       # Return State of GPIO
            if var_gpio_state == str(0):
                    GPIO.output(var_gpio_out,1)                         # Set GPIO to LOW
                    print("Output State IF : " + str(var_gpio_state))              # Print results
            else:
                    GPIO.output(var_gpio_out,0)                         # Set GPIO to LOW
                    print("Output State ELSE: " + str(var_gpio_state))
            sleep(0.5)
    exit()
    

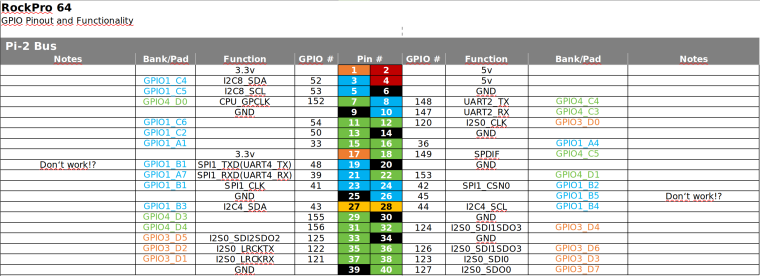
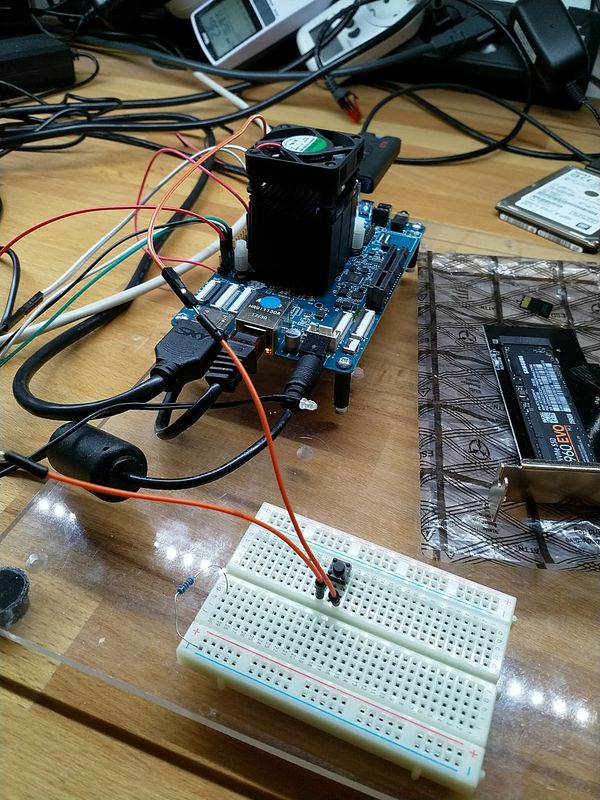
    Was fehlt noch? Der Anschluß der LED. In meinem Beispiel ist die LED wie folgt angeschlossen.

    • Plus(+) der LED an PIN 3 (GPIO1_C4)
    • Minus(-)- der LED an Pin 39 (GND)

    Zum korrekten Anschließen der LED empfehle ich die Lektüre dieses Beitrages!


    Starten des Scriptes

    Um das Script zu starten benutzt man

    sudo python test.py
    

    Ohne sudo bekam ich Fehlermeldungen.


    Fazit

    Es gibt da für mich einige Unbekannte bei dem Thema. Das wären

    • Stimmt die Nummerierung, ist sie komplett?
    • GPIO.setmode(GPIO.ROCK) ermöglichte mir dann mit 52 endlich was zu finden?

    Wir brauchen eine vernünftige Auflistung der Nummern zu den PINs. Gibt es das ? Stimmen alle PIN-Nummern!?

    Bitte dran denken, da kann man sich evt. den ROCKPro64 mit schrotten! Also schön vorsichtig!!

    Danke an Allison und smartdave für die Arbeit!

    Ach, fast vergessen. Ich hab von Python recht wenig Ahnung, macht aber Spaß weil man unkompliziert und schnell zu Ergebnissen kommt.

  • 0_1537460597625_ROCKPro64_GPIO_Reference.png

  • Hiermit kann man seinen ROCKPro64 in Elektroschrott verwandeln! Ich hafte nicht für Schäden! Hirn einschalten vorher! 😉

    Ich bin Euch noch was schuldig geblieben. Nur Ausgänge steuern ist blöd, man braucht auch Eingänge 🙂

    0_1537522069566_Input_ergebnis.jpg

    Beispiel

    Wenn der Taster im Bild betätigt wird, soll die LED blinken.

    Script

    Wir benutzen folgende Ein- Augänge des ROCKPro64.

     # Set Variables
     var_gpio_out = 156
     var_gpio_in = 155
    

    Das heißt:

    • an Pin 1 (3,3V) kommt eine Strippe des Tasters
    • an Pin 29 (Input) kommt eine Strippe des Tasters
    • an Pin 31 (Putput) kommt der Plus-Pol der LED
    • an Pin 39 (GND) kommt der Minus-Pol der LED

    Somit wird auf den Eingang (Pin 29) bei Betätigung des Tasters 3,3 Volt angelegt. Damit wird dann der Eingang als High (1) erkannt. Die LED wird über den Ausgang (Pin 31) gesteuert.

    #!/usr/bin/env python
    
    # Frank Mankel, 2018, LGPLv3 License
    # Rock 64 GPIO Library for Python
    # Thanks Allison! Thanks smartdave!
    
    import R64.GPIO as GPIO
    from time import sleep
    
    print("Output Test R64.GPIO Module...")
    
    # Set Variables
    var_gpio_out = 156
    var_gpio_in = 155
    
    
    # GPIO Setup
    GPIO.setwarnings(True)
    GPIO.setmode(GPIO.ROCK)
    GPIO.setup(var_gpio_out, GPIO.OUT, initial=GPIO.HIGH)       # Set up GPIO as an output, with an initial state of HIGH
    GPIO.setup(var_gpio_in, GPIO.IN, pull_up_down=GPIO.PUD_UP)  # Set up GPIO as an input, pullup enabled
    
    # Test Output
    print("")
    print("Testing GPIO Input/Output:")
    
    
    while True:
            var_gpio_state_in = GPIO.input(var_gpio_in)
            var_gpio_state = GPIO.input(var_gpio_out)                       # Return State of GPIO
            if var_gpio_state == str(0) and var_gpio_state_in == str(1):
                    GPIO.output(var_gpio_out,1)                             # Set GPIO to HIGH
                    print("Input State: " + str(var_gpio_state_in))         # Print results
                    print("Output State IF : " + str(var_gpio_state))       # Print results
            else:
                    GPIO.output(var_gpio_out,0)                             # Set GPIO to LOW
                    print("Input State: " + str(var_gpio_state_in))         # Print results
                    print("Output State ELSE: " + str(var_gpio_state))      # Print results
            sleep(0.5)
    exit()
    
  • Das Projekt (ein Fork) ist aktualisiert und kann jetzt für den ROCK64 und den ROCKPro64 benutzt werden.

    Mit

    setrock('ROCKPRO64')
    

    kann man das Script für den ROCKPro64 anpassen.

    Quelle: https://forum.pine64.org/showthread.php?tid=6419&pid=41270#pid41270

    Sobald ich mal Zeit und Lust habe, werde ich das Testen und hier berichten.

  • Die Coderin von dieser Library Leapo schreibt folgendes

    For anyone using my GPIO library: Just fixed a pretty major bug with GPIO.input, where it would return "1" or "0" as a string rather than as an integer. This fix greatly improves compatibility with scripts written originally for RPI.GPIO. Edit: I've also also fixed Python 3 compatibility (library would crash-out under python 3 if certain debug text was called for).

    Quelle: discordapp.com

    Für den ein oder anderen, der das nutzt vermutlich sehr interessant.

  • Hallo zusammen,

    da ich weiß das dieser Artikel recht beliebt ist, wollen wir den heute mal aktualisieren. Vieles aus den vorherigen Beiträgen passt noch. Es gibt aber kleine Anpassungen.

    Hardware

    • ROCKPro64v21. 2GB RAM

    Software

    • Kamils Release 0.10.9
    • Linux rockpro64 5.6.0-1132-ayufan-g81043e6e109a #ayufan SMP Tue Apr 7 10:07:35 UTC 2020 aarch64 GNU/Linux

    Installation

     apt install python
    

    Danach laden wir das Projekt

    git clone https://github.com/Leapo/Rock64-R64.GPIO
    

    PIN Nummern anpassen

    cd Rock64-R64.GPIO/R64
    nano _GPIO.py
    

    Datei ergänzen

    # Define GPIO arrays
    #ROCK_valid_channels = [27, 32, 33, 34, 35, 36, 37, 38, 64, 65, 67, 68, 69, 76, 79, 80, 81, 82, 83, 84, 85, 86, 87, 88, 89, 96, 97, 98, 100, 101, 102, 103, 104]
    #BOARD_to_ROCK = [0, 0, 0, 89, 0, 88, 0, 0, 64, 0, 65, 0, 67, 0, 0, 100, 101, 0, 102, 97, 0, 98, 103, 96, 104, 0, 76, 68, 69, 0, 0, 0, 38, 32, 0, 33, 37, 34, 36, 0, 35, 0, 0, 81, 82, 87, 83, 0, 0, 80, 79, 85, 84, 27, 86, 0, 0, 0, 0, 0, 0, 89, 88]
    #BCM_to_ROCK = [68, 69, 89, 88, 81, 87, 83, 76, 104, 98, 97, 96, 38, 32, 64, 65, 37, 80, 67, 33, 36, 35, 100, 101, 102, 103, 34, 82]
    ROCK_valid_channels = [52,53,152,54,50,33,48,39,41,43,155,156,125,122,121,148,147,120,36,149,153,42,45,44,124,126,123,127]
    BOARD_to_ROCK = [0,0,0,52,0,53,0,152,148,0,147,54,120,50,0,33,36,0,149,48,0,39,153,41,42,0,45,43,44,155,0,156,124,125,0,122,126,121,123,0,127]
    BCM_to_ROCK = [43,44,52,53,152,155,156,45,42,39,48,41,124,125,148,147,124,54,120,122,123,127,33,36,149,153,121,50] 
    

    Abspeichern.

    Datei test.py anlegen

    nano test.py
    

    Inhalt

    #!/usr/bin/env python
    
    # Frank Mankel, 2018, LGPLv3 License
    # Rock 64 GPIO Library for Python
    # Thanks Allison! Thanks smartdave!
    
    import R64.GPIO as GPIO
    from time import sleep
    
    print("Output Test R64.GPIO Module...")
    
    # Set Variables
    var_gpio_out = 156
    var_gpio_in = 155
    
    
    # GPIO Setup
    GPIO.setwarnings(True)
    GPIO.setmode(GPIO.ROCK)
    GPIO.setup(var_gpio_out, GPIO.OUT, initial=GPIO.HIGH)       # Set up GPIO as an output, with an initial state of HIGH
    GPIO.setup(var_gpio_in, GPIO.IN, pull_up_down=GPIO.PUD_UP)  # Set up GPIO as an input, pullup enabled
    
    # Test Output
    print("")
    print("Testing GPIO Input/Output:")
    
    
    while True:
            var_gpio_state_in = GPIO.input(var_gpio_in)
            var_gpio_state = GPIO.input(var_gpio_out)                       # Return State of GPIO
            if var_gpio_state == 0 and var_gpio_state_in == 1:
                    GPIO.output(var_gpio_out,GPIO.HIGH)                             # Set GPIO to HIGH
                    print("Input State: " + str(var_gpio_state_in))         # Print results
                    print("Output State IF : " + str(var_gpio_state))       # Print results
            else:
                    GPIO.output(var_gpio_out,GPIO.LOW)                             # Set GPIO to LOW
                    print("Input State: " + str(var_gpio_state_in))         # Print results
                    print("Output State ELSE: " + str(var_gpio_state))      # Print results
            sleep(0.5)
    exit()
    

    Beispiel

    Bild Text

    Wenn der Taster im Bild betätigt wird, soll die LED blinken.

    Wir benutzen folgende Ein- Augänge des ROCKPro64.

    # Set Variables
    var_gpio_out = 156
    var_gpio_in = 155
    

    Das heißt:

    • an Pin 1 (3,3V) kommt eine Strippe des Tasters
    • an Pin 29 (Input) kommt eine Strippe des Tasters
    • an Pin 31 (Output) kommt der Plus-Pol der LED
    • an Pin 39 (GND) kommt der Minus-Pol der LED

    Somit wird auf den Eingang (Pin 29) bei Betätigung des Tasters 3,3 Volt angelegt. Damit wird dann der Eingang als High (1) erkannt. Die LED wird über den Ausgang (Pin 31) gesteuert.

    Starten kann man das Script mit

    python test.py
    

  • SATA - Booten jetzt möglich

    ROCKPro64
    1
    0 Stimmen
    1 Beiträge
    244 Aufrufe
    Niemand hat geantwortet
  • ROCKPro64 - Anpassen resize_rootfs.sh

    Angeheftet ROCKPro64
    3
    0 Stimmen
    3 Beiträge
    422 Aufrufe
    FrankMF

    Seit Release 0.10.10 ist das automatische Vergrößern der Root Partition mit drin 🙂

    0.10.10: Support automated resize when booting from nvme

    Einfach das Image auf die NVMe SSD schreiben, ab in den ROCKPro64 und fertig! Nach dem Booten wird die Partition dann automatisch auf die maximal mögliche Größe erweitert.

    Kamil hat das Script auch ein wenig angepasst.

    case $dev in /dev/mmcblk?p?) DISK=${dev:0:12} PART=${dev:13} NAME="sd/emmc" ;; /dev/sd??) DISK=${dev:0:8} PART=${dev:8} NAME="hdd/ssd" ;; /dev/nvme?n?p?) DISK=${dev:0:12} PART=${dev:13} NAME="pcie/nvme" ;;

    Das Resultat bei einer Samsung 979 EVO mit 500GB Speicher

    rock64@rockpro64:~$ df -h Filesystem Size Used Avail Use% Mounted on udev 918M 0 918M 0% /dev tmpfs 192M 5.2M 187M 3% /run /dev/nvme0n1p4 459G 1.2G 439G 1% / tmpfs 957M 0 957M 0% /dev/shm tmpfs 5.0M 4.0K 5.0M 1% /run/lock tmpfs 957M 0 957M 0% /sys/fs/cgroup /dev/nvme0n1p3 229M 44M 169M 21% /boot /dev/nvme0n1p2 12M 0 12M 0% /boot/efi tmpfs 192M 0 192M 0% /run/user/1000

    Perfekt. Danke Kamil!

  • ROCKPro64 - Stromaufnahme wenn OFF

    ROCKPro64
    4
    0 Stimmen
    4 Beiträge
    430 Aufrufe
    FrankMF

    Die Idee war, das eine evt. sehr kleine Stromaufnahme mit dieser Art "Meßgerät" nicht vernünftig erfasst werden kann.

  • 0 Stimmen
    1 Beiträge
    611 Aufrufe
    Niemand hat geantwortet
  • ROCKPro64 - kein WLan-Modul möglich?

    ROCKPro64
    4
    0 Stimmen
    4 Beiträge
    2k Aufrufe
    FrankMF

    Heute, 5 Monate später, kann ich bestätigen das WLan möglich ist 🙂 Getestet auf einem ROCKPro64 v2.1 mit 2GB RAM.

    Eine Vorabversion von Recalbox machte es das erste Mal für mich möglich das WLan zu benutzen. Bericht

    Und PCIe ist abgeschaltet im dts File.

    pcie-phy { compatible = "rockchip,rk3399-pcie-phy"; #phy-cells = <0x0>; rockchip,grf = <0x15>; clocks = <0x8 0x8a>; clock-names = "refclk"; resets = <0x8 0x87>; reset-names = "phy"; status = "disabled"; phandle = <0x8b>; }; pcie@f8000000 { compatible = "rockchip,rk3399-pcie"; #address-cells = <0x3>; #size-cells = <0x2>; aspm-no-l0s; clocks = <0x8 0xc5 0x8 0xc4 0x8 0x147 0x8 0xa0>; clock-names = "aclk", "aclk-perf", "hclk", "pm"; bus-range = <0x0 0x1f>; max-link-speed = <0x2>; linux,pci-domain = <0x0>; msi-map = <0x0 0x89 0x0 0x1000>; interrupts = <0x0 0x31 0x4 0x0 0x0 0x32 0x4 0x0 0x0 0x33 0x4 0x0>; interrupt-names = "sys", "legacy", "client"; #interrupt-cells = <0x1>; interrupt-map-mask = <0x0 0x0 0x0 0x7>; interrupt-map = <0x0 0x0 0x0 0x1 0x8a 0x0 0x0 0x0 0x0 0x2 0x8a 0x1 0x0 0x0 0x0 0x3 0x8a 0x2 0x0 0x0 0x0 0x4 0x8a 0x3>; phys = <0x8b>; phy-names = "pcie-phy"; ranges = <0x83000000 0x0 0xfa000000 0x0 0xfa000000 0x0 0x1e00000 0x81000000 0x0 0xfbe00000 0x0 0xfbe00000 0x0 0x100000>; reg = <0x0 0xf8000000 0x0 0x2000000 0x0 0xfd000000 0x0 0x1000000>; reg-names = "axi-base", "apb-base"; resets = <0x8 0x82 0x8 0x83 0x8 0x84 0x8 0x85 0x8 0x86 0x8 0x81 0x8 0x80>; reset-names = "core", "mgmt", "mgmt-sticky", "pipe", "pm", "pclk", "aclk"; status = "disabled";

    Also bleibt weiterhin ungeklärt, ob auch beides zusammen möglich ist. Also gleichzeitig das WLan-Modul und eine PCIe Karte.

  • Armbianmonitor

    ROCKPro64
    1
    0 Stimmen
    1 Beiträge
    1k Aufrufe
    Niemand hat geantwortet
  • stretch-minimal-rockpro64

    Verschoben Linux
    3
    0 Stimmen
    3 Beiträge
    989 Aufrufe
    FrankMF

    Mal ein Test was der Speicher so kann.

    rock64@rockpro64:~/tinymembench$ ./tinymembench tinymembench v0.4.9 (simple benchmark for memory throughput and latency) ========================================================================== == Memory bandwidth tests == == == == Note 1: 1MB = 1000000 bytes == == Note 2: Results for 'copy' tests show how many bytes can be == == copied per second (adding together read and writen == == bytes would have provided twice higher numbers) == == Note 3: 2-pass copy means that we are using a small temporary buffer == == to first fetch data into it, and only then write it to the == == destination (source -> L1 cache, L1 cache -> destination) == == Note 4: If sample standard deviation exceeds 0.1%, it is shown in == == brackets == ========================================================================== C copy backwards : 2812.7 MB/s C copy backwards (32 byte blocks) : 2811.9 MB/s C copy backwards (64 byte blocks) : 2632.8 MB/s C copy : 2667.2 MB/s C copy prefetched (32 bytes step) : 2633.5 MB/s C copy prefetched (64 bytes step) : 2640.8 MB/s C 2-pass copy : 2509.8 MB/s C 2-pass copy prefetched (32 bytes step) : 2431.6 MB/s C 2-pass copy prefetched (64 bytes step) : 2424.1 MB/s C fill : 4887.7 MB/s (0.5%) C fill (shuffle within 16 byte blocks) : 4883.0 MB/s C fill (shuffle within 32 byte blocks) : 4889.3 MB/s C fill (shuffle within 64 byte blocks) : 4889.2 MB/s --- standard memcpy : 2807.3 MB/s standard memset : 4890.4 MB/s (0.3%) --- NEON LDP/STP copy : 2803.7 MB/s NEON LDP/STP copy pldl2strm (32 bytes step) : 2802.1 MB/s NEON LDP/STP copy pldl2strm (64 bytes step) : 2800.7 MB/s NEON LDP/STP copy pldl1keep (32 bytes step) : 2745.5 MB/s NEON LDP/STP copy pldl1keep (64 bytes step) : 2745.8 MB/s NEON LD1/ST1 copy : 2801.9 MB/s NEON STP fill : 4888.9 MB/s (0.3%) NEON STNP fill : 4850.1 MB/s ARM LDP/STP copy : 2803.8 MB/s ARM STP fill : 4893.0 MB/s (0.5%) ARM STNP fill : 4851.7 MB/s ========================================================================== == Framebuffer read tests. == == == == Many ARM devices use a part of the system memory as the framebuffer, == == typically mapped as uncached but with write-combining enabled. == == Writes to such framebuffers are quite fast, but reads are much == == slower and very sensitive to the alignment and the selection of == == CPU instructions which are used for accessing memory. == == == == Many x86 systems allocate the framebuffer in the GPU memory, == == accessible for the CPU via a relatively slow PCI-E bus. Moreover, == == PCI-E is asymmetric and handles reads a lot worse than writes. == == == == If uncached framebuffer reads are reasonably fast (at least 100 MB/s == == or preferably >300 MB/s), then using the shadow framebuffer layer == == is not necessary in Xorg DDX drivers, resulting in a nice overall == == performance improvement. For example, the xf86-video-fbturbo DDX == == uses this trick. == ========================================================================== NEON LDP/STP copy (from framebuffer) : 602.5 MB/s NEON LDP/STP 2-pass copy (from framebuffer) : 551.6 MB/s NEON LD1/ST1 copy (from framebuffer) : 667.1 MB/s NEON LD1/ST1 2-pass copy (from framebuffer) : 605.6 MB/s ARM LDP/STP copy (from framebuffer) : 445.3 MB/s ARM LDP/STP 2-pass copy (from framebuffer) : 428.8 MB/s ========================================================================== == Memory latency test == == == == Average time is measured for random memory accesses in the buffers == == of different sizes. The larger is the buffer, the more significant == == are relative contributions of TLB, L1/L2 cache misses and SDRAM == == accesses. For extremely large buffer sizes we are expecting to see == == page table walk with several requests to SDRAM for almost every == == memory access (though 64MiB is not nearly large enough to experience == == this effect to its fullest). == == == == Note 1: All the numbers are representing extra time, which needs to == == be added to L1 cache latency. The cycle timings for L1 cache == == latency can be usually found in the processor documentation. == == Note 2: Dual random read means that we are simultaneously performing == == two independent memory accesses at a time. In the case if == == the memory subsystem can't handle multiple outstanding == == requests, dual random read has the same timings as two == == single reads performed one after another. == ========================================================================== block size : single random read / dual random read 1024 : 0.0 ns / 0.0 ns 2048 : 0.0 ns / 0.0 ns 4096 : 0.0 ns / 0.0 ns 8192 : 0.0 ns / 0.0 ns 16384 : 0.0 ns / 0.0 ns 32768 : 0.0 ns / 0.0 ns 65536 : 4.5 ns / 7.2 ns 131072 : 6.8 ns / 9.7 ns 262144 : 9.8 ns / 12.8 ns 524288 : 11.4 ns / 14.7 ns 1048576 : 16.0 ns / 22.6 ns 2097152 : 114.0 ns / 175.3 ns 4194304 : 161.7 ns / 219.9 ns 8388608 : 190.7 ns / 241.5 ns 16777216 : 205.3 ns / 250.5 ns 33554432 : 212.9 ns / 255.5 ns 67108864 : 222.3 ns / 271.1 ns
  • ROCKPro64 - Platinenerkundung

    ROCKPro64
    1
    0 Stimmen
    1 Beiträge
    594 Aufrufe
    Niemand hat geantwortet