Skip to content

Redis - Keys von einer DB zu einer anderen DB kopieren

Redis
  • Ich hatte bei meinen Python Projekten drei Datenbanken am Start, als Beispiel Redis DB 0, 1, 2
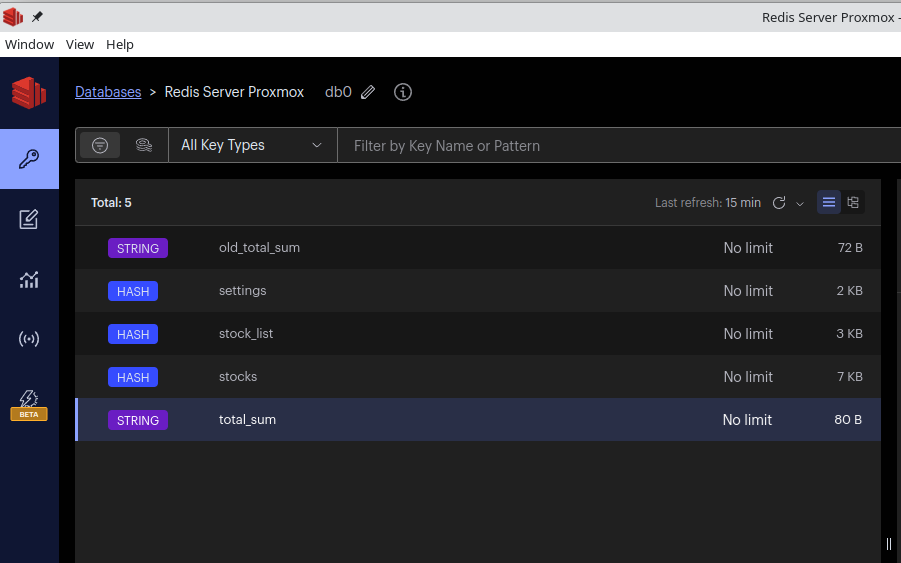
    Nun wollte ich das mal zusammenfassen, da ich das so nicht mehr brauche. Also alle Keys in DB 0. So soll das am Ende aussehen.

    c17e4998-859d-4c6d-bcc5-7ff244b9a817-grafik.png

    settings, stock_list und stocks waren jeweils in einer eigenen DB. Die beiden STRING Werte dienen nur zum Zwischenspeichern, sind hier jetzt mal nicht so wichtig. Nur, wie kopiert man denn nun den KEY aus der einen DB in die andere? Es war eine lange Sitzung mit Chat_GPT da klemmte es doch öfter. Aber, am Ende stand der Erfolg 🙂

    Auf dem Redis Datenbank Server habe ich folgendes Script erstellt.

    #!/bin/bash
    
    # Define Redis host and optional authentication password
    REDIS_HOST="192.168.3.9"
    REDIS_PASSWORD="PASSWORD" # Remove or leave empty if no password
    
    # Function to execute Redis command with optional authentication
    execute_redis_command() {
        if [ -n "$REDIS_PASSWORD" ]; then
            redis-cli -h $REDIS_HOST -a $REDIS_PASSWORD "$@"
        else
            redis-cli -h $REDIS_HOST "$@"
        fi
    }
    
    # Fetch all fields (and their values) from the source hash in database 1
    mapfile -t fields_values < <(execute_redis_command -n 2 HGETALL stock_list)
    
    # Loop through the fields_values array
    # Bash arrays are zero-indexed, fields_values contains field name followed by value, so we increment by 2
    for ((i=0; i<${#fields_values[@]}; i+=2)); do
        field="${fields_values[i]}"
        value="${fields_values[i+1]}"
    
        # Use HSET to insert the field-value pair into the target database (database 0)
        execute_redis_command -n 0 HSET stock_list "$field" "$value"
    done
    
    echo "All fields from DB 1 copied to DB 0 successfully."
    

    Als erstes mal ein Hinweis. Sollten im Passwort Sonderzeichen sein, geht das so nicht. Dann muss man das so lösen.

    redis-cli -h $REDIS_HOST -a 'PASSWORD' "$@"
    

    Ich denke, das sollte als Hinweis reichen. Was macht das Script?

    # Fetch all fields (and their values) from the source hash in database 1
    mapfile -t fields_values < <(execute_redis_command -n 2 HGETALL stock_list)
    

    Wir holen alle Fields und ihre Daten von der Datenbank 1 für den KEY stock_list. Dann loopen wir da durch

    # Use HSET to insert the field-value pair into the target database (database 0)
    execute_redis_command -n 0 HSET stock_list "$field" "$value"
    

    Und hiermit speichern wir dann die Daten in Datenbank 0 unter dem KEY Namen stock_list. Das hat soweit super geklappt, außer das ich immer eine leer Zeile in der Datenbank unter Fields hatte. Hab sie einfach gelöscht. Wenn man mal Langeweile hat, kann man mal suchen warum das so ist 😉

    Am Ende hatte ich dann meine drei Datenbanken alle zu einer zusammengefasst. Eine Sünde aus meiner Anfangszeit ausgebessert. Nun hatte ich ja auch drei Datenbank Klassen, die jeweils die Redis Connection initialisiert hatten. Den dreifachen Code konnte ich auch gut entsorgen. So sah er aus.

    class PortfolioSettings:
    
        def __init__(self, host=config.SERVER_IP, port=6379, db=None):
            if db is None:  # If db is not provided explicitly, use TEST_MODE to decide
                if config.TEST_MODE == 1:
                    db = config.TEST[0]
                else:
                    db = config.LIVE[0]
    
            # Verwende einen Connection Pool
            self.pool = redis.ConnectionPool(
                host=host,
                port=port,
                db=db,
                password=config.REDIS_PASSWORD,
                # Auto-Reconnect einstellen
                retry_on_timeout=True,
                # Optional: Weitere Einstellungen wie maximale Wiederverbindungsversuche,
                # Timeout-Werte, etc. können hier konfiguriert werden
                health_check_interval=30  # Überprüft die Verbindung alle 30 Sekunden
            )
    
            # self.client = redis.StrictRedis(host=host, port=port, db=db, password=config.REDIS_PASSWORD)
            self.client = redis.Redis(connection_pool=self.pool)
    

    Danach so

    class PortfolioSettings:
    
        def __init__(self, connection_pool=config.shared_redis_pool):
            self.client = redis.Redis(connection_pool=connection_pool)
    

    Und unter meiner config.py initialisiere ich das Ganze so.

    # Initialize a single shared connection pool
        shared_redis_pool = redis.ConnectionPool(
            host=redis_host_ip,
            port=6379,
            db=LIVE[0] if TEST_MODE == 0 else TEST[0],
            password=REDIS_PASSWORD,
            retry_on_timeout=True,
            health_check_interval=30
        )
    

    Und wie immer, seid vorsichtig mit dem REDIS Passwort! Auf einem produktiven System danach bitte gut aufräumen. Für mich aktuell nicht so wichtig, der Server läuft hier lokal.

  • 0 Stimmen
    5 Beiträge
    143 Aufrufe
    FrankMF

    Hab ChatGPT nochmal nach der Installation auf einem Production Server befragt.

    ChatGPT

    Certainly! Here's a short example of the steps you can follow to deploy a Flask application on a production server using Nginx and Gunicorn:

    Prepare your server:

    Set up a server (e.g., using a cloud provider like AWS, DigitalOcean, or a dedicated server) and ensure it has a clean, up-to-date installation of a Linux distribution (e.g., Ubuntu or CentOS).

    Install required software:

    Install necessary software packages on your server. You'll need Python, pip (Python package manager), Nginx, and Gunicorn. You can use your distribution's package manager (e.g., apt for Ubuntu or yum for CentOS) to install these dependencies.

    Deploy your Flask application:

    Copy your Flask application code and any required dependencies to your server.

    Set up a virtual environment (optional but recommended):

    Create a virtual environment for your Flask application to isolate its dependencies. You can use venv or virtualenv for this purpose.

    Install Flask and any required Python packages within your virtual environment:

    pip install flask

    Test your Flask application:

    Ensure your Flask application runs correctly within your server's virtual environment.

    Configure Gunicorn:

    Create a Gunicorn configuration file (e.g., gunicorn_config.py) to specify the settings for running your Flask application. Here's a simple example: workers = 4 # Number of Gunicorn worker processes bind = '0.0.0.0:8000' # The address and port Gunicorn should listen on

    Start Gunicorn:

    Start Gunicorn with your Flask application: gunicorn -c gunicorn_config.py your_app:app

    Configure Nginx:

    Create an Nginx server block (often located in /etc/nginx/sites-available) to define how Nginx should handle incoming requests. Here's a simplified example: server { listen 80; server_name your_domain.com www.your_domain.com; location / { proxy_pass http://127.0.0.1:8000; # Pass requests to Gunicorn proxy_set_header Host $host; proxy_set_header X-Real-IP $remote_addr; } }

    Enable the Nginx server block and restart Nginx:

    sudo ln -s /etc/nginx/sites-available/your_config /etc/nginx/sites-enabled/ sudo nginx -t # Test Nginx configuration sudo systemctl restart nginx

    Configure your DNS:

    Point your domain name to your server's IP address.

    Secure your server (optional but recommended):

    Set up SSL/TLS certificates for your domain to enable HTTPS. You can use Let's Encrypt for free SSL certificates.

    Monitor your application:

    Set up monitoring tools and logs to keep track of your application's performance and troubleshoot any issues.

    These are the basic steps to deploy a Flask application on a production server with Nginx and Gunicorn. Please note that this is a simplified example, and there are many additional considerations, such as database configuration, security, and optimization, depending on your specific application and requirements. It's also important to keep your server and software up to date and follow security best practices to ensure the stability and security of your production environment.

    Das werde ich doch mal ausprobieren 😎
  • Redis Insight - Desktop UI

    Redis
    1
    0 Stimmen
    1 Beiträge
    78 Aufrufe
    Niemand hat geantwortet
  • Redis - systemd anpassen

    Redis
    1
    0 Stimmen
    1 Beiträge
    54 Aufrufe
    Niemand hat geantwortet
  • 0 Stimmen
    1 Beiträge
    2k Aufrufe
    Niemand hat geantwortet
  • Redis - Datenbanken löschen

    Redis
    1
    0 Stimmen
    1 Beiträge
    140 Aufrufe
    Niemand hat geantwortet
  • Redis Replication über Wireguard

    Redis
    5
    0 Stimmen
    5 Beiträge
    379 Aufrufe
    K

    👍
    spart bischen zeit

  • Redis installieren

    Angeheftet Verschoben Redis
    1
    0 Stimmen
    1 Beiträge
    359 Aufrufe
    Niemand hat geantwortet
  • Redis Datenbank sichern

    Verschoben Redis
    1
    0 Stimmen
    1 Beiträge
    749 Aufrufe
    Niemand hat geantwortet